Saturday, December 31, 2011

Ooooooh, I like this!

So, I have a friend whose sister is soon to have a baby girl. This soon-to-be new mama, loves purple. And my friend has asked me to make a dress for the new baby.
All she asked for is something with chicks smocked on it and it needed to PURPLE. I convinced her that a newborn would look better in white with lavender accents in the smocking. Here is the smocking.
I use this tiny trim on baby dresses quite often. It is available from many places; I usually buy mine from Old Fashioned Baby because Jeannie always has it in stock. I like it because it is sweet, simple and soft. I really don't like lace near a baby if it is scratchy.

I'm sure many of you have seen the technique of using entredeux and threading floss through the little holes, like beading. This is a very pretty technique and a nice way to pick up the colors of your smocking. However,  entredeux is a bit stiff for the edge of a smocked baby sleeve. Soooooo, I attached this sweet little edging by hand, and then threaded it with one strand of lavender floss. I love how this looks and my "client" will love the additional purple. Here is the sleeve. I will do this on the collar as well.

I wish you all a happy, healthy, and prosperous New Year, which will include lots of smocking, sewing,embroidery, knitting and spinning!

Sunday, December 18, 2011

Oops, no picture of Egg Girl

I just looked at my last post and realized that the picture of my egg ornament, made by a dear friend did not make it to the post. Here it is.

Friday, December 16, 2011

Almost there!


I keep saying, "I'm done!".......and then I start just one more Christmas project. Here are the Lucy jumpers I made for Adelaide and Vivi. I found the snowman button sets at Joann's and had 95% of the materials required in my stash. I tucked little Christmas tissues in their pockets.


Lucy is a versatile, quick pattern. The hemming by machine and the turning right side out can be confusing. The first one I did went great. No problem; I didn't even have to think about it. The second jumper was another story. What a mess I made,
but finally figured it out. I think Lezette has a You Tube video on this subject. Did I go back and refer to it? NO! I will try to be more thoughtful and organized when I make my next Lucy.

Here is my tree, decorated, and a few of my favorite ornaments. It is a homey, New England tree. When my kids were growing up I really wanted to have all white lights on my tree. But the kids really liked the colored lights. Now I am sentimentally attached to the colored lights, but guess what? My kids have all white lights on their trees! Go figure!

This ornament is not homemade, but has two of my  favorite things: kitties and cardinals!
 

I have carefully wrapped and protected this ornament through two moves and 34 years of Christmas ornament storage. It was made for me by the mother of a terminally ill infant I cared for early in my nursing career. We went on to become lifelong friends, and thankfully she and her husband went on to have two very healthy children. This little girl was made from an egg, in a likeness of my older daughter, Chelsea. She is front and center on my tree every year. I have given my children almost all of the ornaments which have been purchased or made for them over the years, but I can't part with this one just yet.

caption


This is a new ornament for my tree this year, made by the newest member of our SAGA chapter, The Charles River Smockers. What  could be better than a handmade item for our annual Yankee Swap? And the story of her last minute finishing was hysterical. Stuck at home with no car, she found a scrap of gingham for the backing, used cotton balls for stuffing and dismantled a swag to get the cording. That's Yankee ingenuity! Thanks Karla!


And here is my little Samuel, the newest grandchild, born October 9th. We woke him from a sound sleep for the photo opp with Santa! Poor little guy. Santa doesn't need to leave me anything under the tree....these precious grandchildren are all I need to make my holiday perfect.
I promise pictures of the girls in their finery! I hope you all have a wonderful holiday season.

Saturday, December 10, 2011

Christmas is Coming!

 I went into the grocery store today and realized that every person I came across was stressed and unsmiling. I am usually pretty stressed by Christmas as well, which is the reason Thanksgiving is my favorite holiday! Anyway, I decided today that I will enjoy the parts of  the holiday that are important to me. Sewing, baking and crafting with Adelaide and Vivienne.  If the house is not decorated perfectly, who cares. Monday the girls and I are making Nutcracker themed cupcakes and a tree garland made from card stock circles and red and white baking string.

Our beautiful Christmas tree is up, but not decorated as yet. I will do that tomorrow along with the annual baking of Swedish Cardamon Bread. We went to Seasons Four today for little Samuel to get his picture with Santa. NO LINE!! And a great Santa with real long white hair and beard, and a very generous girth! Sam again this year challenged me to purchase the first tree we chose. I think this is the third or fourth year we have done this, and again the tree is just perfect. We have a lot of laughs doing this. It takes approximately two minutes for me to hone in on a tree. I do not profess to have great "tree choosing" ability......I just think all the trees are perfect!


Here is Miss Adelaide's Christmas dress. Most of you have seen it. Just wanted to tell you a few details. It is a combination of two patterns, Lee and Anne. It is basically a Lee, but I used the yoke from Anne as that pattern has a deeper yoke, and I did not want any more rows of smocking, and needed the bottom of the smocking to match up with the bottom of the back yoke. I also used the long sleeve from Anne, but made it less full and made a narrow bias rather than a cuff. I really love this little  "candy cane" dress, but I cannot believe she is old enough to fit into this big girl dress!
Christmas 2008....How time flies!

Saturday, December 3, 2011

My Favorite Christmas Craft

What is this?
If you guessed a bowl full of peppermint and wintergreen candy you would be
WRONG!!
It is cutest Christmas Tree garland that you ever saw...... and it took 20 minutes to make.  I can't take credit for the idea; it came from one of my favorite blogs, Sew 
Many Ways. She used all peppermint, but I like mine because there is no printing on the cellophane. (Starlight Holiday Mints purchased at Stop & Shop.) She suggests using a low temp glue gun on the twisted ends and then press them together. Donna and I bought one at Michael's for $2.99. Much better than burning my fingers and I think a regular glue gun might melt the cellophane. This would be a fun craft to do with a child, but one older than three or four. 
Hope you enjoyed this, and that you will make one for your tree!


Swedish Festival

Today was the Swedish Festival at the Cyclorama in Boston. Adelaide has been attending Swedish School since September and much of the past two months has been spent rehearsing for the St. Lucia processional and singing. Well Miss Adelaide has refused to rehearse. She either cried, just walked away or spent the time doing a solo dance routine. So today our whole family was biting our respective nails. Will she? Won't she? Well she did!!! And she knew every word to every song!Her papa was so happy! Kids....you just never know. The little girl in the gingerbread girl dress is Nora, Marcia Anderson's grand daughter. They were both perfect. Little Samuel spent his time in a sound sleep. Cute family, don't you think? The Swedish Festival was great...lots of vendors selling beautiful Swedish items, most Christmas related, and amazing pastry.
More sewing on another day. We spent the rest of today getting the outdoor decorations up. Bring on Christmas!

Friday, November 25, 2011

Nutcracker Coat

I recently tackled my first coat. It is done, it is cute. However, I have to say I really did not enjoy making it. I think if I lived in the South and could make a coat out of wool challis, I would have had a great time. But living in New England, a winter coat needs to be warm and so I used a lovely red heavy wool; I think it is called Melton. The pictures really do not do the color justice.
I also interlined it with flannel. Just made the whole thing awkward. I also made a muff, with a pocket. I remember having a muff as a little girl. Mine was white fur, rabbit, I think. I loved that muff. I hope Adelaide will enjoy hers. Chelsea is taking her to the Nutcracker tomorrow and although it will be in the 60 degree range, Adelaide will insist on wearing her new coat and muff. Sewing for that little soul is so rewarding! Now on to her Christmas dress.


As some of you know, Thanksgiving is my favorite holiday. No hype, no gifts, just good food and family time. We had ten around our two tables in this tiny doll house, plus little Samuel in his car seat. Both Vivi and Adelaide were a bit under the weather with colds, but were darling in spite of it. The food was fabulous, thanks to lots of help from my daughters. Adelaide and Vivi made their contribution by helping me make the cranberry sauce, a version with orange zest, Grand Marnier and chopped, toasted pecans. Here are the tables before the chaos.
 And here is a sample of our place cards. Surprise..... they were pins as well and everyone was required to wear theirs. The girls just loved it.
My gratitude this year revolves around the name Samuel. I am so grateful for the safe arrival of our new grandson, Samuel. I am also so grateful that hubbie Samuel was at our Thanksgiving table eleven months after his heart attack. This could have been a very sad Thanksgiving for our family, but thanks to Dr. Christopher Pyne and the superlative care at Lahey Clinic, Sam will be carving the turkey for years to come!

Friday, October 21, 2011

Mary De, the final chapter

OK, it's time to finish Mary De. In my last post we finished by drawing in the armhole curve and pulling the gathering thread to the inside of this drawn in line. Now stitch right over the drawn line, trying not to stretch or distort the smocking. For safety, stitch it twice. Be very careful NOT to stitch over your gathering thread as you will need it for final adjustment. Next cut out the armhole close to the stitching. In the photo below, the yellow thread is my gathering thread.

Now it is time to apply the piping to the yoke, paying attention to the seam allowance, which is 1/2 inch where the smocking is attached to the yoke, and where the back skirts are attached to the back yokes. All other seam allowances are 1/4 inch. After the piping is stitched to the yoke press it with the seam allowance toward the yoke. Now place the smocked piece under the yoke to make the final adjustment of the smocked piece to the exact measurement of the yoke. NOW tie off the gathering thread to this measurement and adjust pleats evenly.  Then apply "Wonder Tape" to the seam allowance of the yoke, trying to place it out of the way of where you will be stitching.

Next place the yoke over the smocked skirt, very carefully placing it exactly where you want it. You must be mindful of the 1/2 inch seam allowance, but you will be able to place it very accurately. Press down to stick it to the skirt. Next flip the yoke down and stitch with the yoke side up. If you have a three groove foot this step is easy because your piping can ride in one of the grooves and you will be able to stitch right up close to your piping and keep the stitching consistent. Wonder Tape will dissolve with washing, but if you want you can remove it now, as long as you have not stitched over it. NOW you can remove the gathering thread. Do you see why this gathering row is so important?  Grade your seam allowance.
 The next steps of the dress are pretty straight forward. The only other tricky part involves a typical Children's Corner "Stitch and Turn" technique that is puzzling, but it works. Smocking patterns of yesteryear were very scant on instructions, and most have not been corrected or updated. I think the newer patterns have more detailed instruction. Anyhoo, once you have stitched your neck and back yoke lie your dress out like this.
Now you need to stitch the armholes. Bring right front to right back, right sides together, encasing the entire dress between. It will look like this.

Double stitch the armhole, trim and clip the curve. Next pull the backs through to the front. NOW. at this point I guarantee you will think you have done something wrong because the dress is still wrong side out! But alas, there is one more step! Pull the one back through to the front and VOILA! You have done it! Repeat for the second side. I really tried to take pictures of this turning business, but they just looked like a bunch of fabric. One other pattern detail. The button holes on the newer patterns are vertical; they should be horizontal. Button holes are always in the direction of the stress that will be placed on the garment, with the exception of a shirt or dress front with a placket. Here is my dress, minus a hem. I really need to try this dress on my girl before hemming. As usual I will also do a grow tuck.
As I have said, I have made dozens of Mary De. If you have not and you still find it daunting, even after these (hopefully) helpful instructions, there is another pattern alternative. Bonnie Blue has this pattern with several variations, one of which is smocked. The back is just like Mary De. I have not made it yet, but it is certainly worth a try. The instructions may be more detailed.
 This is the smocking plate I used, or at least a portion of it.

It is a Grace Knott plate. If you have seen her plates, you may find the colors off-putting and the designs dense and with too many rows. However, they are a fabulous resource. Change up the colors and use only selected rows. The stitch combinations are really quite beautiful. Check out the Grace Knott website. The company is run by Grace's grandson, with Judith Marquis as their designer. Lots to offer on the website including a plate of the month! Also check out Grace Knott's story featured in Creative Needle July/August 1997. She came to Canada in 1930 as a war bride. Quite a story about her, her family and the business.

Now on to Christmas projects! Vivi will wear a bishop dress that was Adelaide's. A new dress for the big girl. Just a basic yoke in a fine red and white stripe. I have made Vivi two dresses just for her this year, but since the use of Christmas dresses is a bit limited, she gets a gently used dress this year. Here is the bishop dress.

OHHHHH! I just came across this photo of Vivi in her "going home" outfit! Grandchildren really do make growing old worthwhile! I promise to post pictures of Sammy soon.

Sunday, October 16, 2011

Mary De Revisited

Samuel Robert Braithwaite arrived on October 9th, weighing 8 lbs 10 oz.
Meredith is starting to feel better, and everyone is quite smitten with little Sammy.

  Adelaide thinks he is very pretty and can't stop kissing him. Vivi just wants to get the magnets off Auntie's refrigerator. He looked beautiful in his going home outfit....pictures of that later.

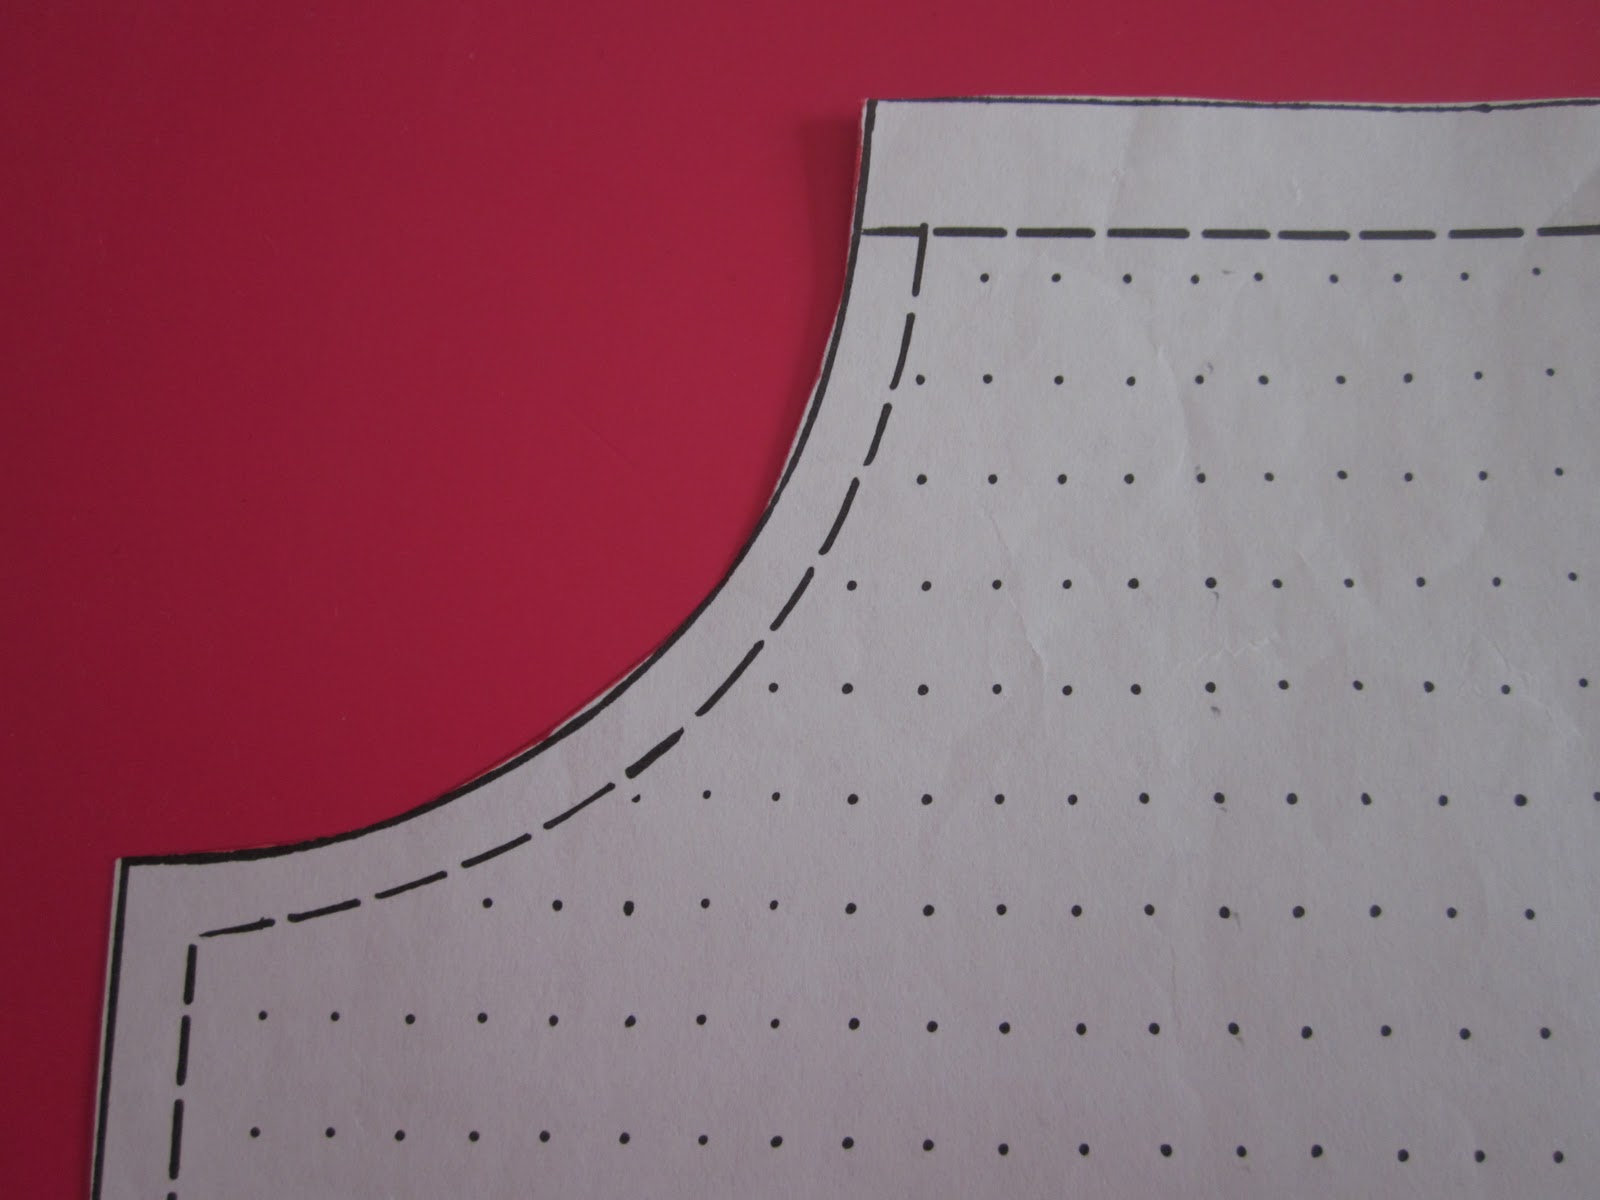
Let's get back to Mary De. Today I want to tell you about some issues with cutting and pleating. Here is a picture of the curve on skirt front pattern. In the next picture I have matched the skirt piece to the front yoke lining piece.

You can see that they line up perfectly. The directions say to cut out the front skirt and pleat. First of all if you cut it out with the curve cut out,  it would be very difficult to pleat. Secondly if you then pull up the pleats to smock, the piece would then have a much smaller armhole than the front yoke. SO....cut out or tear your front skirt without cutting or marking the armhole curve, and pleat the desired number of rows. I usually pleat two more rows than I am going to smock; a gathering row at the top and an extra row at the bottom because it is easier to smock the last row if there is a pleated row below it.

Next take the front yoke lining piece, tape it to a window and make a full paper copy. You will end up with this.


Open up your pleated piece to the full width of this piece and tie of your pleating threads. DO NOT TIE OFF YOUR GATHERING ROW AT THE TOP!!! Now you are ready to smock.

When your smocking is complete, remove your pleating threads, BUT NOT THE GATHERING ROW AT THE TOP. You will need to steam your smocked piece to fit, and mark your armhole curves. (No matter how careful you are about your tension, it usually ends up smaller than what your started with. This is not a problem as smocking is quite elastic.)I usually do this right on my ironing board. Once again use the front yoke lining piece. Mine, pictured below is a little wider because I left larger seam allowances to be trimmed later. Pin straight down one side of the smocking spread pleats evenly and open to the width of the pattern piece.


Pin down the other side of the smocking. Keep the top edge in line with the gathering thread. I usually pull that thread to the front at this point. Steam and spray the smocking. I use steam and a spray bottle of water. You can use spray starch, but I think it just makes your dress sticky. Allow to dry, overnight if necessary.

Next line up the skirt pattern piece with your smocked piece and mark the armhole edge with a washable marker or pencil. Pull the gathering thread to a bit more than 1/4 inch inside the armhole marking. The pin in the picture marks the poin to which I have pulled my gathering thread. Tie ONE side of the gathering thread in a big knot and trim off the remainder.


This is as far as I want to go today. I will continue as I construct this Mary De.

However, I do want to say that there is an alternative to this method. If you are making larger than a sized four, and your fabric is only 45 inches wide, you may not be able to have the smocking continue under the arm. (If your fabric is 45" and you want your smocking to continue under the arm, you can add two side panels before pleating.) But if the smocking is not going to go all the way to the side seam, cut out and pleat the skirt as above. Then pull the pleated fabric out flat and mark the armhole curves at this point. Pull the gathering threads out, back to 1/4" inside this line, and continue to pull them back to the same pleat down the length of the rows. Adjust the pleats to the front yoke piece, rather than the lining, and tie them off. Again, DO NOT TIE OFF THE GATHERING THREAD. Smock and then steam to the width of the front yoke piece, with the flat armhole area off to each side. Frankly I really like this dress smocked all the way to the side seam, so it is worth it to me to add the side panels. And there are so many fabrics that are 54 or 60 inches wide that this is seldom a problem. There is also a technique for doing this dress with a smocked insert, rather than the smocked skirt, but I would advise making the smocked skirt one or two times before attempting the insert.

The fabric I am using for my Mary De  is a brushed twill. Adelaide loves it because it is soft, us grown up types like it because it is warm. You will find it listed under twills, then individual fabrics will be listed as brushed twill. 

More later this week. Happy sewing!

Monday, October 3, 2011

Mary De AGAIN!!

     I have made literally dozens of Mary De jumpers, a Children's Corner pattern. It is a jumper/sundress and blouse pattern that is well suited to the extreme temperatures of New England. Some of you may remember that I made one for Adelaide last Thanksgiving. It was a sweet floral print in a brushed twill. Miss Adelaide loved it because it was so full and the fabric so soft. There has been a daily battle with Mama and Papa because the "Princess Dress" is the only thing she wants to wear. Here she is at The Museum of Fine Arts last January. (Yes that is Vivi in the background in a smocked corduroy jumper.)                                            

   I recently brought the dress home to launder (sidewalk chalk mixed with water all over the smocking). After a few repairs, (lots of going down slides, bike riding etc.) I decided the girl really deserves a new Mary De. It is all smocked, but I need to interrupt the construction to help a friend with a project. More on Mary De in a later post, including some tips on constructing this sweet jumper.
  

               And yes Vivi loved her Monkey dress! Getting a dress on this child is usually a battle which includes tears, pouting, wriggling out of arm's reach, and then pulling on the dress until she gets distracted by something. THIS dress she loved. I also made her a Curious George quilt.....A HUGE hit!
    

   So it is FALL! I don't know about you but I am crazy about Autumn. We are fortunate to live in New England; there is no place more beautiful at this time of year. Besides the urge to bake apple pie, make hearty soups, and get cozy in front of the fire, this is the time to get serious about our needle arts. Vacations are over, kids are back in school, the days are shorter, and there is no more yard work to do!
So, come on, get going! Let me know what you are working on! I will post again when I can get back to Mary De. Also working on a beautiful sweater, and a pumpkin hat for my new grand baby, who is very reluctant to make an appearance! And for Heaven's sake, pick some apples!!!